Building My First Electric Longboard

A couple years ago a close friend convinced me to convert my Landyachtz pintail longboard into an electric longboard. Here is a quick overview of how I did it. In the future when I inevitably build another one then I will write a step-by-step guide with my thought process behind every decision.
Contents
Project Constraints
I had the following constraints for my first electric longboard:
- Total cost <$2000 (and ideally <$1000)
- Parts can be retrofitted onto my Landyachtz pintail deck
- Full assembly can be completed within a single weekend after all the parts arrive (i.e. I wouldn't have to design/manufacture any electronics, hardware or software myself)
- Wouldn't need any specialized/expensive equipment that I didn't already have
Brainstorming
Some things had to be researched and decided on before ordering parts:
- Single or dual motors?
- Front, rear, or all-wheel drive?
- Do I want the motors be visible when the board is wheels-to-ground?
- How fast do I want it to go?
- What should the range be?
- What kind of drive train?
Final Requirements
For the sake of simplicity, ease of assembly and low cost here were my final requirements for the design:
- Single motor
- Front wheel drive
- Motor should not be visible when the board is wheels-to-ground
- 20+MPH top speed
- Ideally 10+ miles range
- Belt drive
Reasoning
An electric longboard with a single motor would drive down the overall cost of the system. I also felt that a front wheel drive design with the motor pointing inwards towards the center would not only help with the overall aesthetics of the final product but it would also feel more natural under my feet when the board pulls you forward as you engage the throttle on the Bluetooth remote control. It would also be a lot simpler to assemble.
I went with the belt drive because of three reasons: a) there existed ready-made sets of wheel pulleys, motor pulleys, and belts to choose from, b) they were very reasonably priced and c) it is much quieter than the chain drive. The downside of the belt drive is that it is not always a one-size-fits-all even when the math checks out. Sometimes you just can't get the belt to remain perfectly seated or it might be just a little too loose and will need to be constantly adjusted after a couple rides. But I was willing to live with that.
Finally, after playing around and plugging in some numbers to calc.esk8.it I was able to figure out the characteristics of the batteries that I'd need. Typically for my specific use case I'm looking at LiPo batteries since they are already popular for other hobbies such as RC cars and quadcopters.
Plugging and chugging numbers into the online esk8 calculator isn't a perfect science. You'll need to know the type of battery, number of cells, motor KV, motor efficiency, motor pulley teeth, wheel pulley teeth, and wheel size. The website will automatically calculate the battery voltage, motor RPM, gear ratio, and top speed. So if you're not hitting your desired top theoritcal speed then you can adjust any of the parameters and see which one will have the greatest effect and you can use some critical thinking to figure out which is most cost-effective (i.e. bigger wheels, bigger battery, or better motor).
Calculating Range
Using the following formula I can calculate the top theoretical range based on my parts:
( (Nominal voltage of battery) x (Number of cells) x (Amp-hours) ) / 10 = # of kilometers
For example:
My battery configuration is two LiPo battery packs in series which gives me 10s1p - meaning 10 cells in series and 1 in parallel. The battery also provides us with 5Ah. Lastly, the nominal voltage of a LiPo battery cell is 3.7V.
( (3.7V) x (10s) x (5Ah) ) / 10 = 185Wh / 10 = 18.5 km = 11.56 miles
Since 11.56 miles is more than 10 miles then the two LiPo batteries in series configuration meets my requirements.
If I wanted to double my range I could get another two LiPo battery packs for a total of four. I'd first hook up two batteries in parallel, twice, which gives us 5s2p twice. Then I'd hook up both of those in series which gives us 10s2p once. Connecting the batteries in parallel also doubles the capacity to 10Ah.
( (3.7V) x (10s) x (10Ah) ) / 10 = 370Wh / 10 = 37 km = 23.125 miles
The only problem with doubling range is that my longboard deck might not have the space to accomodate the two extra batteries. And the board would weigh more (these batteries are heavy!).
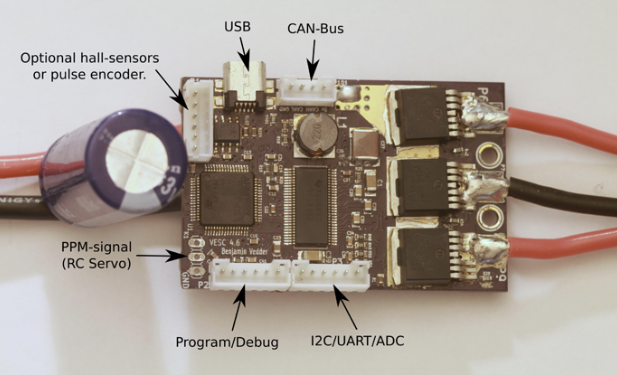
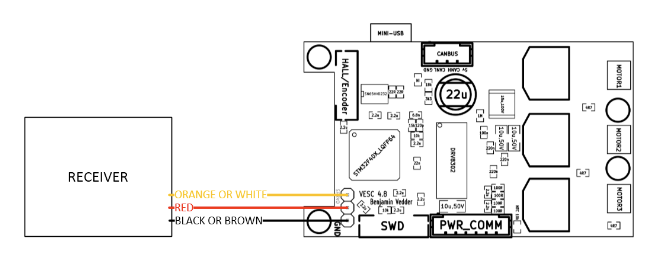
Schematics
It makes sense to know how you're going to connect things. You know there's a motor, a couple batteries, a VESC, the Bluetooth receiver, a power switch, and the belt drive.
You'll learn how to connect everything by researching components, figuring out what inputs/outputs they come with, what are the constraints like if the motor has a maximum power and/or loading charge capacity, which it does ;).
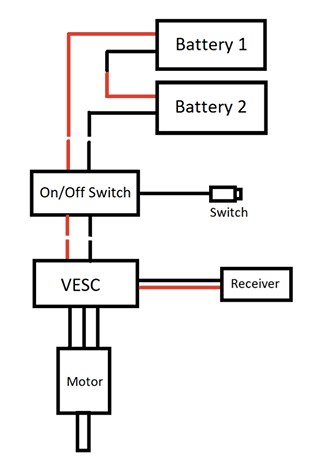
If you want to earn extra credit you can splice in a cheap digital voltmeter between the batteries and on/off switch to display the system voltage everytime you power on the board. Highly recommended.
Bill of Materials
This is the initial list of required parts I came up with:
| Part | Part Name | Amount | Cost Per Part |
|---|---|---|---|
| Longboard Deck | Any pintail | 1 | ~$50-200 |
| Batteries | Turnigy 5000mAh 5S 18.5V 25C 35C | 2 | $60 |
| Battery Charger | ACDC LiPo NiMh Battery Balance Charger | 1 | $55 |
| VESC | Torque ESC BLDC DIYElectric | 1 | $85 |
| Power Switch | N/A | 1 | $40 |
| Motor | RC Turnigy 6374-149kv Brushless 2250W | 1 | $90 |
| Motor Mount | Caliber II Motor Mount 63mm | 1 | $15 |
| Trucks | Caliber Trucks Cal II 50 | 1 | $40 |
| Wheels | Orangatang Kegel 80mm, 77a (4x) | 1 | $60 |
| Bearings | Bones Reds | 1 | $10 |
| Wheel Pulley | 36T 12mm | 1 | $37 |
| Motor Pulley | 16T 12mm | 1 | $15 |
| Belt | 265mm 12mm | 1 | $8 |
| Remote | RC Nano | 1 | $60 |
| Enclosure | Enclosure | 1 | $10 |
| Industrial Strength Velcro | N/A | 1 | $10 |
| Loctite Thread Locker Blue | N/A | 1 | $10 |
| Liquid Electrical Tape | N/A | 1 | $10 |
| Total: | ~$725-875 |
Other useful things to have:
- Workbench
- Soldering iron kit or station
- Multimeter
- Digital voltmeter
- Wire stripping tool
- Wire crimping tool
- Heat shrink tubing assortment
- XT90 Male-to-female and Female-to-male connectors
- 10 Gauge black and red wires
- Electric drill
Steps for Assembly
- Cover VESC 3-pin with liquid electrical tape
- Solder new 5.5mm connectors onto motor
- Install new trucks onto deck
- Mount bearings into wheels
- Install drive train (aka the belt drive)
- Mount motor
- Connect batteries to series conenctor
- Connect series connector to power switch
- Connect power switch to VESC
- Put heatshrink onto motor leads
- Connect motor leads to VESC
- Download VESC tool
- Connect VESC to PC
- Configure VESC
- Charge batteries to max (21V per pack for total of 42V in series)
- Connect transmitter/receiver to VESC
- Drill enclosure to deck
- Mount/install electronics into enclosure
- Install/connect digital voltmeter for that sweet extra credit
- Test the system. Reconfigure VESC as needed.
- Take it for a ride.
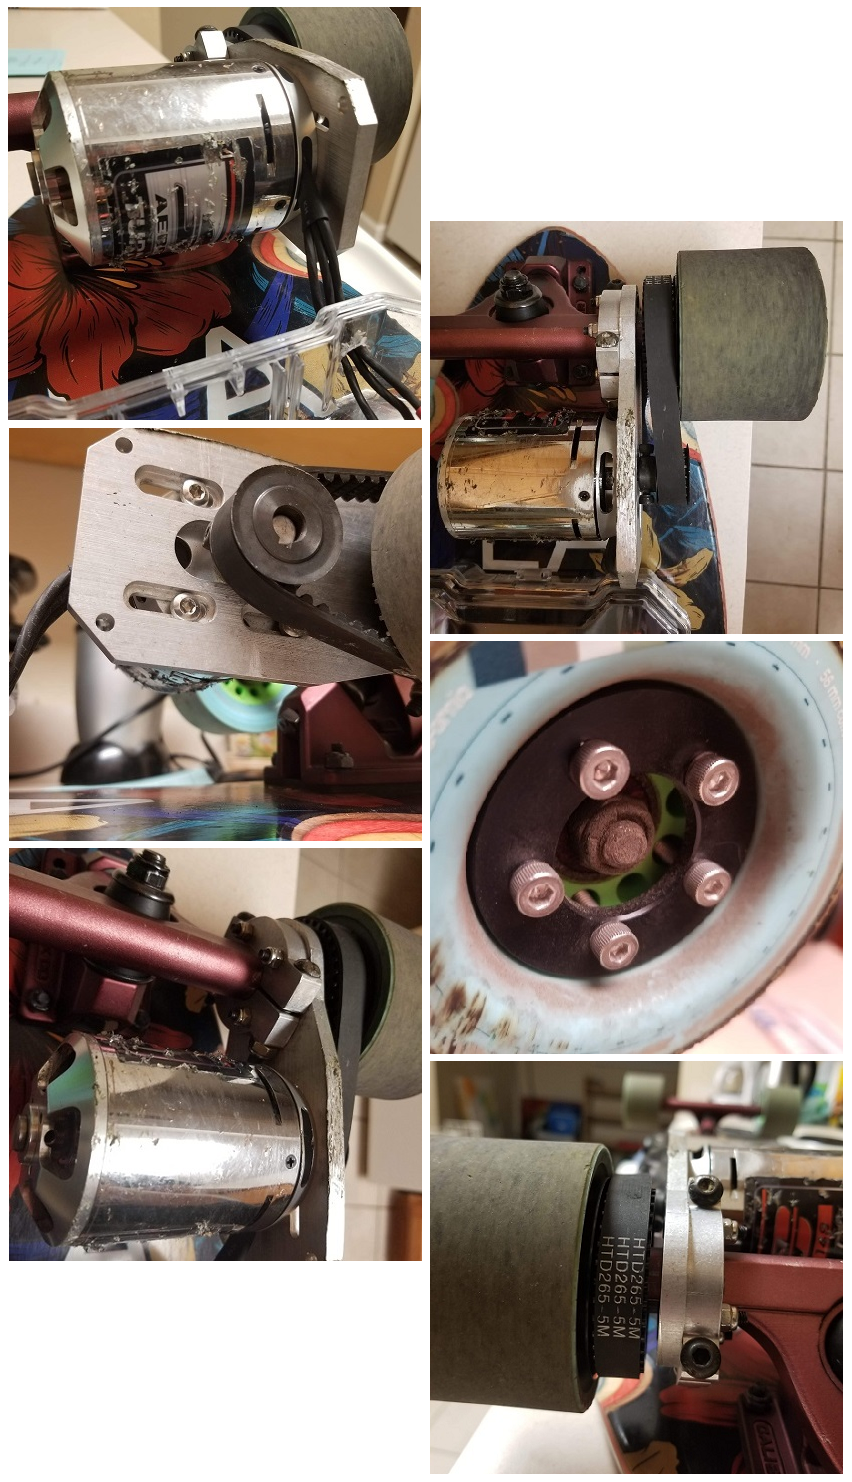
Pictures of My Build
I've since transferred all components onto my Honey Skateboard deck which is a few inches longer than the Landyachtz (42" versus 36") for additional stability at higher speeds, so these are the only pictures I have of the original build.
Future Upgrades
Things I'd do differently when I build a new board:
- Build my own LiPo battery packs ($$$)
- Integrate a Battery Management System
- Double the range
- Try a dual motor system
- Wheels for going up/down grassy and dirt hills
- Convert the voltmeter reading into estimated mileage remaining and have the display be visible to me while riding
- Further adjust the VESC throttle curve for a smoother start/stop
- Make a sleeker electronics enclosure
